Hello Guest it is March 18, 2024, 11:45:53 PM

Author Topic: The Laser Project.  (Read 1191308 times)

0 Members and 2 Guests are viewing this topic.

Re: The Laser Project.
« Reply #240 on: October 07, 2010, 04:25:22 PM »
Hi,

Great project, very inspiring!
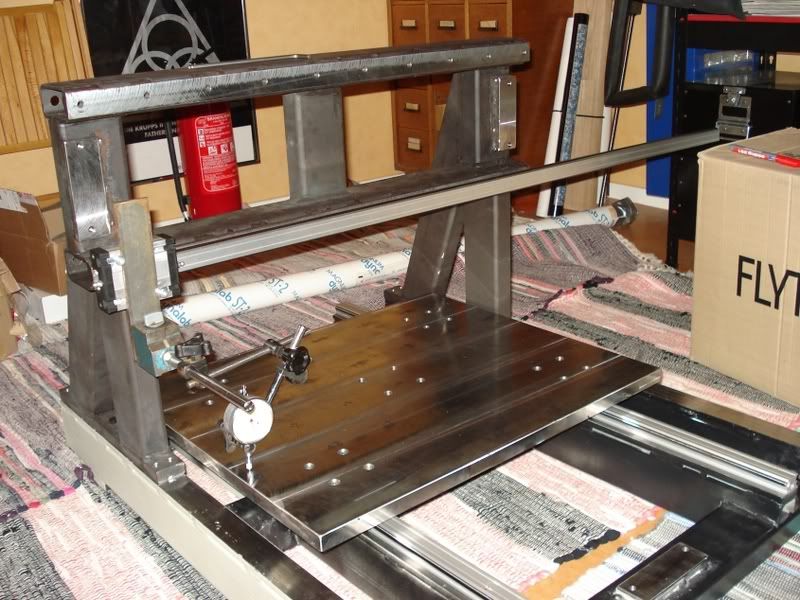
I have a machine in the making that is surprisingly similar to your machine!

I have a Synrad 48-1 (16W) that I am going to fit on it and regarding the tickle electronics I solved that by asking a friend to program an 8 pin PIC microcontroller to take mach step + dir (or step + laser on), generating the tickle and adding that to the step-pulses. There is also a manual mode where a button sets laser on and a pot or voltage 0-5V sets the laser power for testing or other applications.
It worked right away but might need som tweaking and input from other users to be perfect. My friend also made a pcb for it but I have it on protoboard for now. Drop me a PM if you are interested in testing it, I have much work ahead until it's laser time!

I have been building my machine very slowly for a few years but life, work and kids seem to get in the way all the time... :)
I'll make a thread about it when I get a little further off the ground so to speak!

This is a pic from february 2008 and not much progress has been made since! :(


This is my laser with improvised cutting nozzle with 12diameter, 50mm focus lens. The lens is far to close to the laser for optimal cutting cuality but its ok for experimentation.


(sorry for the threadjack, I just saw some (infrared) light in the end of my tunnel!) :)
« Last Edit: October 07, 2010, 04:35:42 PM by dar303 »

Offline Tweakie.CNC

*
  • *
  •  9,194 9,194
  • Super Kitty
    • View Profile
Re: The Laser Project.
« Reply #241 on: October 08, 2010, 01:52:52 AM »
Hi Dar303,

As you say amazingly similar machine construction. Machining the ways and screw mounting pads prior to fitting the rails etc solves the welding distortion problems and is a lot more professional than my approach of using shims - keep up the good work.  :D

I look forward to seeing more pictures of your progress and completion of the project. Your PIC controller sounds very interesting and could be just what I need for my Synrad.

Thanks for sharing your information.

Tweakie.
PEACE
Re: The Laser Project.
« Reply #242 on: October 08, 2010, 10:51:32 AM »
They are not only machined, the whole thing was put in a giant oven at Rolls Royce/Kamewa plant in Sweden, I have a friend that worked there building tools and fixtures for water jet propulsion eh... stuff! Lucked out on that one, they put it in with some giant machine parts for free!
I am not a machinist och mechanical engineer (my field is electronics) but I am learning with the help of forums like this and very patient friends... :)

I got some new energy now! Do you have a link to mor details about your machine, motors, drivers etc? This forum is big!
Re: The Laser Project.
« Reply #243 on: October 08, 2010, 01:12:35 PM »
You could have a look at Tweakie website at this address.

http://www.tweakie.byethost10.com/


Nice stuff there

Jeff
« Last Edit: January 14, 2020, 05:27:10 AM by Tweakie.CNC »

Offline Tweakie.CNC

*
  • *
  •  9,194 9,194
  • Super Kitty
    • View Profile
Re: The Laser Project.
« Reply #244 on: October 08, 2010, 01:50:08 PM »
Dar303,

Nice to hear you say that this forum has given you new energy. This is a great place to learn and before you know it that project of yours will be completed and you will have little bits of stuff you have made all around the workshop and cluttering up the house etc just like everyone else.  ;D

Tweakie.
PEACE
Re: The Laser Project.
« Reply #245 on: October 08, 2010, 06:05:32 PM »
wow, that was a good read, your site ate my friday evening! :)
I am especially impressed by the 4:th axle with the homemade worm gear!!!

Offline Tweakie.CNC

*
  • *
  •  9,194 9,194
  • Super Kitty
    • View Profile
Re: The Laser Project.
« Reply #246 on: October 22, 2010, 12:39:48 PM »
A few people have asked me if my laser could be used to make printed circuit boards and my answer has always been no. The problem is that copper is such a good reflector at the CO2 wavelength of 10600nm that possibly a kilowatt or more of power (certainly more than I have) would be necessary to vaporize the copper and then it would almost certainly vaporize the glass board underneath as well.
Like all things there is always more than one way of doing everything so as an alternative approach, and being a slack day, I tried this;

The copper clad glass board was sprayed with a rattle can car spray paint then, when dry, the required pattern was laser etched (paint removed) using the Mach3 Impact/Laser plugin. I didn’t quite get this one aligned correctly horizontally but it proves the point that as a system it will work. The car spray paint is resistant to the ferric chloride pcb etchant so all I need to do now is chemically etch away the unwanted copper, drill the holes and clean off the remaining paint. It only took a few minutes to produce this, certainly less time than it will take to etch.

I think this system would be more suited to surface mount rather than through hole because there is no X – Y GCode a drilling file cannot be easily produced and drilling by hand is a real pain when you have a CNC machine sitting idle.

I doubt that this application had been envisaged when the Mach3 Impact/Laser plugin was written.  ;D ;D

Tweakie.
PEACE
Re: The Laser Project.
« Reply #247 on: October 22, 2010, 03:26:02 PM »
Wow, nice! You are always on the cutting edge!

Offline Tweakie.CNC

*
  • *
  •  9,194 9,194
  • Super Kitty
    • View Profile
Re: The Laser Project.
« Reply #248 on: October 24, 2010, 11:50:31 AM »
Thanks, but I think I am a few years behind  :'(

I wondered if the color of the paint used would make any difference to the way the laser performed - answer no.
Surface mount is definitely preferable for this process - now where did I put that etching tank ?.

Tweakie.
PEACE
Re: The Laser Project.
« Reply #249 on: October 24, 2010, 05:45:13 PM »

now where did I put that etching tank ?.

Tweakie.

Look at the fish tank ::) ::) :D

Jeff