Mach4 Screen Editing – Custom Button functions

A user contacted me asking how to get an operator interface to interact with the screen set. A button interacting with the screen set has been a key function of Mach4 since the inception of the screen designer. In this blog I will try to give you the power to make this happen.

The first concept you need to understand is the idea of an event driven system. The “event” is telling you that something happened. For example, we will look at what happens when you have a button press. In this example the button will be a NO (Normally Open) providing a zero when off and a one when it is on. When the button is triggered an event input is sent with a 1 saying that your finger is on the button. When you take your finger off the button an event of zero is sent saying that you have taken your finger off of the button. Why would we ever need to know that the button is down? Operations like jogging are handy to have an up and down event on. Also, if you would like to have a tool release button, it is nice if the tool releases when the button is in the pressed (1 state). Now let’s make this work in the code.

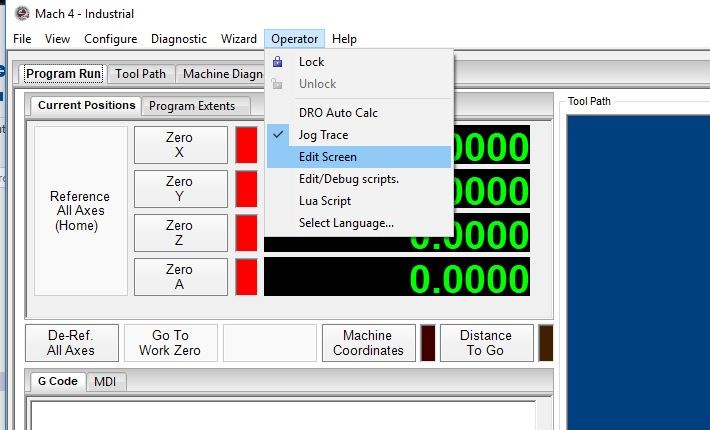
This task is going to require some screen editing. With Mach4 in a disabled state you can enter screen editing mode. This is under operator-> Edit screen

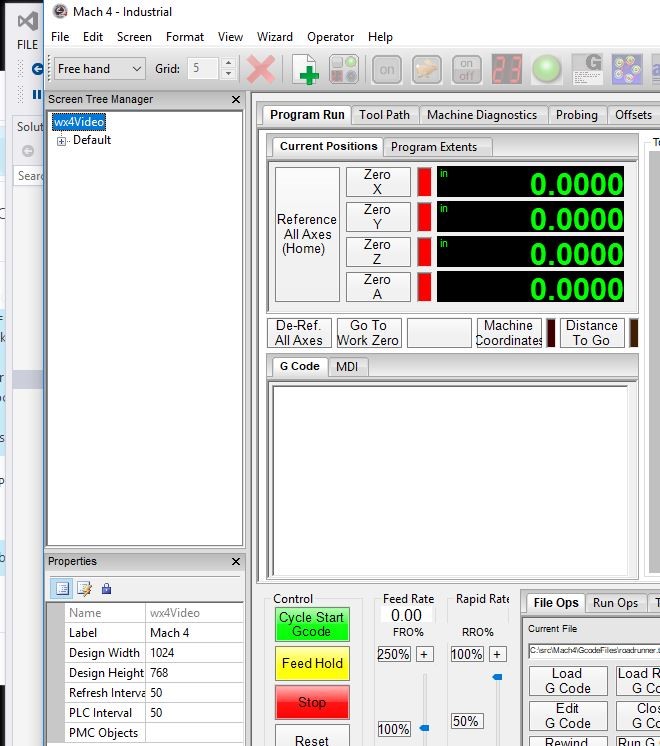
In the screen editor you can edit the screen scripts. Access the scripts in the left-hand tree portion of the screen.

Select the screen name in the ‘screen tree manager’.

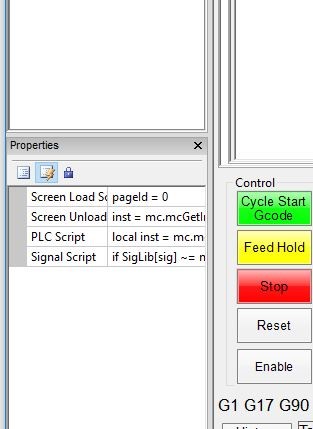
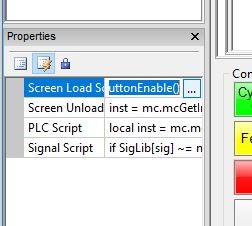
When you click on the ‘screen load script’ a small button with three dots will appear. This allows editing of the script in mcLuaEditor.

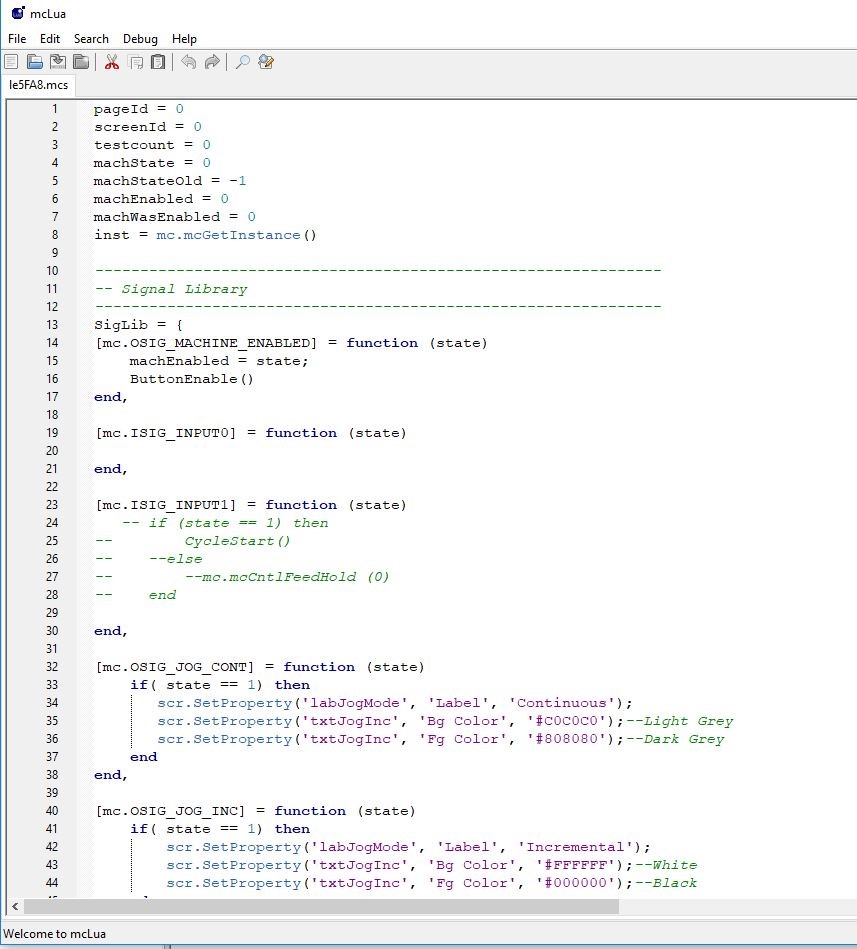
You should have something that looks like this after pressing the button with three dots.

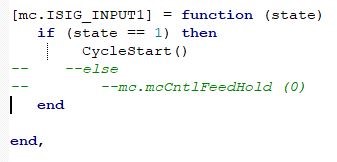
Now we are working on the actual script.  ‘SigLib’ is a table that holds functions that allow you to have access to the events in Mach4 such as inputs and outputs. A fun example of this is in the table at [mc.ISIG_INPUT1] You can see that we have some code that is green because they are comments. The minus, minus sign before the code makes it into a comment in the Lua language. For a test, remove the double minus signs as shown in the following example:

This will call or enable the cycle start button code just like the button was pressed. When input 1 is high (you pushed the button with your finger) a cycle start will be sent.

The code that we left green (commented), is to make it so you have to keep your finger on the button to allow motion. When your finger comes off the button the mc.ISIG_INPUT1 event is called with a State == 0, so it will fall into the “else” part of the “if” statement and send a FeedHold to the system. The trick is to know what Lua call you need to specify to have the system perform the correct action.

We have some other things we can do to make Mach4 do our bidding. The “scr.” functions have lots of power, allowing you to read and set values. You can change the color, text, position, size … you name it, on the fly! The other fun thing you can do is “Press”  the button with another script. You can do a scr.ButtonClick(<name>) to simulate clicking the button. You also can simulate the up and down action of the buttons on the screen.

What you should get from this post is that we have ways to tie the physical world to the screens and if you would like to exercise this power you will need to learn a small amount of Lua. But you should also note that we have put some examples in the screens to show you how this is done.

Please see the following video for more information

Good luck and enjoy!

From Script Monkeys… Powered by bananas

Why Lua???

A Small Bit of History and Why:

In the beginning we had basic DOS and it was simple. VB script was sort of like the old basic and made us think we sort of knew what we were doing. This is true, but at the same time we were looking for something that was cross platform. Visual Basic is anything but cross platform. The other feature we were looking for was speed of execution. Visual basic is really slow and was declared legacy software in 2008, so two strikes against VB. We moved onto Python and saw they had a wxPython binding. With the wx frame work this will allow graphics and dialogs to be done within the scripting language. + 1 for Python! We looked at the speed and it was not so good...


https://www.machsupport.com/wp-content/uploads/2017/08/VB-226x223.jpg
https://www.machsupport.com/wp-content/uploads/2017/08/Lua-225x224.png

Along came Lua, the little know language from Brazil. We did some testing and it is FAST (+1)! We also found it with the wx binding wxLua(+1). The icing on the cake is that Lua was 100% cross platform (+1). Yeah to say that we were excited was an understatement. We did some google stocking for who was using Lua. We were shocked to see that many games where using Lua because of the need to have a very fast script engine with ultimate control and flexibility.


We started coding and testing Lua. We determined after a few hours of programming the syntax was ugly and had a face only a mother could love. The other hard thing, that took a little time at the keyboard, was the use of tables in Lua. If you don’t use tables you are missing one of Lua’s greatest strengths.


Us Giving it a go:

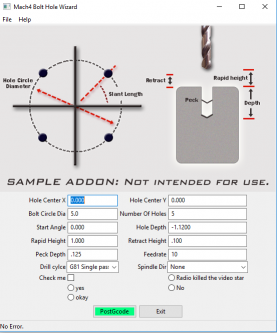
The first idea - make a wizard for Mach4 to drill a bolt hole circle. This example is called “BoltHoleCircle.mcs” and can be found in the Mach4Hobby (or Mach4industrial) / wizards folder. You will see in the header that I did this on 08/03/2013 (time goes by fast). We did this all with the idea that we would not have any editors to make a dialog (also called an IDE). So this dialog was all done with some special functions that use the sizers to layout everything for you.


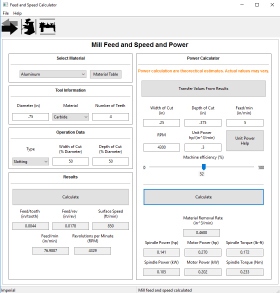
∇ Below is an actual Wizard that is part of Mach4 for calculating the correct feed and speed.

https://www.machsupport.com/wp-content/uploads/2017/07/BoltHoleWizard-277x333.png
https://www.machsupport.com/wp-content/uploads/2017/07/MillFeedandSpeed-280x293.png


The power of Lua was starting to show real promise! Soon, the developers we talking about pie in the sky ideas and how it would be nice to have cool little wizards in the screen so that it would be a tool they could use without popping up a window. Also, what if the users could share this and simply pop some code in the screen and not edit any code! This was the start of the Lua Panel! This handy little tool can make wizards show up in the screen as an integrated operator tool. The development team thought that with this much power there will be many cool things thay users will do with this!


Ahhhhh!

Some time went by and we made some silly little examples that really where not that great. Then MachMotion contacted us and showed us what they did with the tools we gave them. We were floored! WOW! We asked to look at the code and it was nothing like our original bolt hole wizard. So we did what anyone would do... I asked how they did it 🙂 Enter WXFormBuilder, This is a cool open source project that allows people to design visually and output the language of your choice. Lua is one of the options and it really has saved lots of head banging while trying to make a simple dialog or connect events. In my next blog I will show you how to add some cool engraving to the screen!

https://www.machsupport.com/wp-content/uploads/2017/08/C_Pain-300x200.jpg

Till next time,

We're routing for you, we're all in this together. Keep your stick on the ice..

Mach Development Team