Hello Guest it is March 29, 2024, 03:00:01 AM

Author Topic: Success! Mini Machining Center under Mach3 control - Video link  (Read 375895 times)

0 Members and 1 Guest are viewing this topic.

Offline BR549

*
  •  6,965 6,965
    • View Profile
Re: Success! Mini Machining Center under Mach3 control - Video link
« Reply #300 on: January 29, 2015, 11:01:24 AM »
Yes the creast of the thread is FLAT not pointy .  That is the OPERATORS responsibility  to get the ID/OD correct for the thread.

 The G84 routine would NOT refhome the machine in the real world it would invoke Spindle Sync where the spindle encoder drives the Z axis to make sure the motions of Z and the spindle are locked together in motion. It is NOT a problem with a servo spindle but is required with a VFD driven spindle motor.  Might want to look into that part for your customers that do not have a servo spindle (;-).

M19 would be to position the spindle for a tool holder AND to REF the spindle to a known point for peck tapping. It can be 0.000 or any degree from there.It should be adjustable to allow for different tool changer setups. Simple Macro there.

G28.1 C0 ( Moves to C home index point)
G0 C180.000  ( Moves to orientation point)

The NICE thing about Mach3 is you are not limited to just 3 param inputs for a macro call the number is LARGE.

M9000 #1=1 #2=22 #3=333  ,etc,etc

You can input as many #vars as you like and MACH3 calls the #vars first then runs the Mcode (;-)

I would like to see the picture of the machine it will help me understand how it works axis wise. That way the code will be easier to write.

NOW it is a gamble to mix CB and Gcode in the same macro. Most times it works and SOME TIME it does not due to timing problems. (;-) IT can be PC dependant.

(;-) TP


« Last Edit: January 29, 2015, 11:04:28 AM by BR549 »

Offline BR549

*
  •  6,965 6,965
    • View Profile
Re: Success! Mini Machining Center under Mach3 control - Video link
« Reply #301 on: January 29, 2015, 10:36:35 PM »
Steve have you ever thought about thread milling instead of single point threading ??

Just a thought, (;-) TP

Offline simpson36

*
  •  1,369 1,369
    • View Profile
Re: Success! Mini Machining Center under Mach3 control - Video link
« Reply #302 on: January 30, 2015, 09:32:03 AM »
Yes the creast of the thread is FLAT not pointy .  That is the OPERATORS responsibility  to get the ID/OD correct for the thread.

That could be said for everything that your wizard  . . or any wizard  . .  does. I don't understand the logic of taking one aspect of threading and excluding it so that the operator sits there with your wizard in front of him . .  along with a calculator.

I was going to suggest another 'convenience feature' for you to add, that being an avoidance or clearance move added to the generated G-code to jump over or around chuck jaws. This occurred to me yesterday as I was adding these moves to a radial drilling program to keep the drill bit from visiting the chuck jaws. In this case it was not possible to simply increase retract because I was out of Z travel with this large part in the large ULTRA 4th axis.

The code to move 1" positive X before rotating the A and then returning had to be added to the sub. Granted, its not a big deal to add such things, but none of this stuff is particularly complicated , including any bolt circle, and it just boils down to convenience.

Whether clearance moves are 'operator responsibility' or not, they are frequently a necessary part of the process when you are work holding in a chuck.

Having to go back and edit the generated code is the difference between a good wizard and a great wizard . . . .  just a thought.  ;)
 

 The G84 routine would NOT refhome the machine in the real world it would invoke Spindle Sync where the spindle encoder drives the Z axis to make sure the motions of Z and the spindle are locked together in motion. It is NOT a problem with a servo spindle but is required with a VFD driven spindle motor.  Might want to look into that part for your customers that do not have a servo spindle (;-).

I added the servo spindle controls to the screen set for the people who purchased my spindles . .  which are all servo driven. I decided to leave it there for customers to use if they ever move to a servo powered spindle. It is not actually a product in itself, so there are no 'customers' for that particular feature.


M19 would be to position the spindle for a tool holder AND to REF the spindle to a known point for peck tapping. It can be 0.000 or any degree from there.It should be adjustable to allow for different tool changer setups. Simple Macro there.
G28.1 C0 ( Moves to C home index point)
G0 C180.000  ( Moves to orientation point)

'peck tapping'  . . there's a new one on me. I have not heard that term, but it is exactly what I do and why the starting point has to be maintained. The only difference is that unlike tool changes, the actual azimuth for tapping is unimportant, so long as it does not change.   Well . .  at least that's true for servo   8) powered spindles.

The NICE thing about Mach3 is you are not limited to just 3 param inputs for a macro call the number is LARGE.

M9000 #1=1 #2=22 #3=333  ,etc,etc

You can input as many #vars as you like and MACH3 calls the #vars first then runs the Mcode (;-)

Now you just made my day   :-*   I did not know this and have never come across anything that indicates this capability. Awesome Awesome.   But wait . . .  MACH4 also?

I would like to see the picture of the machine it will help me understand how it works axis wise. That way the code will be easier to write.

I was drilling on that spindle until past 7PM last night, but I'll get some shots today. Since this is probably general interest stuff, I'll post a low res version here and get a high res to you for use in your project.

NOW it is a gamble to mix CB and Gcode in the same macro. Most times it works and SOME TIME it does not due to timing problems. (;-) IT can be PC dependant.

I know it can be something of a Dance with the Devil, but I have been using named macros with MACH ever since I learned about them (credit to HimmyKabibble, Thanks Ray!). With the exception of the master screen macro, pretty much ALL of my InTurn™ control stuff resides in named macros and the numbered stuff does nothing but call the named stuff. CNC whisper down the lane, so to speak. Almost all of the timing issues go away because for whatever reason, MACH suspends until a named macro returns and it does not wait for numbered macros . . . unless something has changed.

There is a 'speed reached' LED on the InTurn™ controller and it indicated the status of a 'hold' on MACH processing until the 4th axis was up to speed. Otherwise, MACH would be moving a cutting tool into a part that was barely moving yet. Not good. Since converting everything to named macros, the LED is still there, but it no longer does anything except light up. The hard wired 'hold' to MACH is long gone.


[/quote]

Offline simpson36

*
  •  1,369 1,369
    • View Profile
Re: Success! Mini Machining Center under Mach3 control - Video link
« Reply #303 on: January 30, 2015, 09:42:40 AM »
Steve have you ever thought about thread milling instead of single point threading ??

Just a thought, (;-) TP

I own a couple of thread mills that see very infrequent use. I do development and prototyping under contract and for my own projects. Thread milling, in my opinion, is most applicable to production work. The problems I have with thread milling are manifold:

*Thread mills are stupidly expensive.
*One wrong move and they go to thread mill heaven . . . and I specialize in wrong moves
*Stupidly expensive
*Very limited reach
*Require uber accurate highly rigid machine. I have the accuracy, but 'not so much' on the stiffy  :P
*Did I mention stupidly expensive?

Offline BR549

*
  •  6,965 6,965
    • View Profile
Re: Success! Mini Machining Center under Mach3 control - Video link
« Reply #304 on: January 30, 2015, 11:52:43 AM »
Thread milling   Remember this for a 4th/5th axis turn center not a simple CNC lathe

For large diam threads Thread milling beats single point cutting hands down. Manual TURN machines and simple CNC lathes did single point because they had no other choice.  Your machine has a choice as it is NOT a conventional LATHE.

A single operation.

IF your machine can MILL an accurate circle you can do accurate thread milling. Does not have to be as rigid as you think

Cutter not any more expensive than a carbide boring bar with thread insert.

Can reach just as deep on large holes. Can even use the single point boring bar to do single point thread milling.


As to operators responsibility. All standard threads and profiles are listed in the Machinist Handbook.  All crusty machinists will have a copy(;-). No calculator needed but you WILL have to put your glasses on , at least I do.

Creating the profile for the part to be threaded is normally a seperate operation as it requires different tools.

Before you begin the thread operation reguardless of what method the stock HAS to be the correct size. That way when the threads are cut to spec the profile is correct.  

As to clearance moves a good wizard will let you EDIT the GCODE on the FLY to add such moves. This one does as well  {EDIT GCODE} OR I can add an edit Button that is conversational in nature BUT you still have to be able to tell it WHERE and HOW to dodge the problems. The wizard CANNOT read the part in the Chuck. (well it COULD but (;-))

Rememeber Wizards are conversational AIDS to programming NOT a robotic programmer of parts(;-).

Just a thought, (;-)
« Last Edit: January 30, 2015, 11:58:23 AM by BR549 »

Offline simpson36

*
  •  1,369 1,369
    • View Profile
Re: Success! Mini Machining Center under Mach3 control - Video link
« Reply #305 on: January 31, 2015, 11:29:46 AM »
Thread milling   Remember this for a 4th/5th axis turn center not a simple CNC lathe

For large diam threads Thread milling beats single point cutting hands down. Manual TURN machines and simple CNC lathes did single point because they had no other choice.  Your machine has a choice as it is NOT a conventional LATHE.

A single operation.

IF your machine can MILL an accurate circle you can do accurate thread milling. Does not have to be as rigid as you think


I have a 20TPI threadmill that I use for large holes in aluminum, where no tap is available.

Cutter not any more expensive than a carbide boring bar with thread insert.
Can reach just as deep on large holes. Can even use the single point boring bar to do single point thread milling.

Absolutely, however, I rarely snap off a boring bar. In terms of spinning a single point tool, I do this to cut ACME internal threads above a certain diameter. I have a solid carbide single point ACME thread cutter that I mount in a boring head. For shallow threads, I might use the boring head to increase the 'diameter' of the cutter, and for larger stuff I would interpolate.

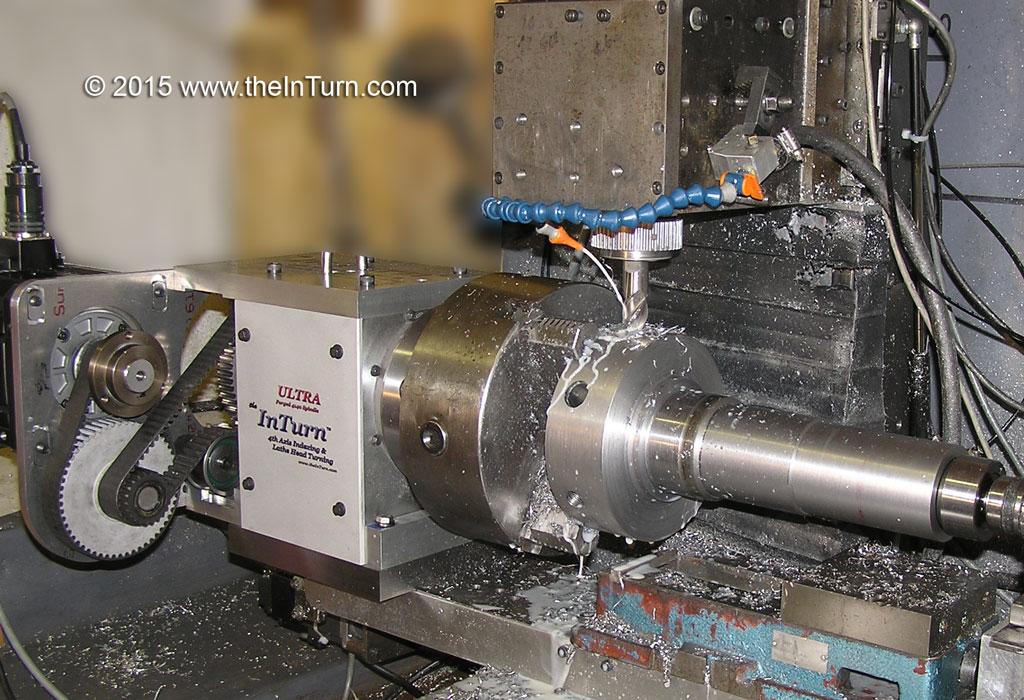
Overall however, I think we are talking about different things. I agree with you as far as using a thread mill on the mill spindle. The topic was cutting internal thread on a lathe (or the 'lathe' setup of a mill/turn specifically). For starters, you would need some way to spin a threadmill. I do have a horizontal spindle setup for the mill head, but as you might imagine from the photo, typically it would not be able to be positioned to reach into the end of a workpiece.

You are speaking in absolutes, and in that context I cannot disagree with anything you have said. However, another conversation is in the context of what is practical on a given actual machine, and those two conversations are different. Like discussing steppers and servos in as the same topic because they are both 'motors'.


As to operators responsibility. All standard threads and profiles are listed in the Machinist Handbook.  All crusty machinists will have a copy(;-). No calculator needed but you WILL have to put your glasses on , at least I do.

Wow, you really ARE old school!   Machinists handbook next to a machining center. That is an amusing juxtaposition. Sort of like having rails in front of a saloon to tie your car to so it doesn't wander off.  ;)


Creating the profile for the part to be threaded is normally a seperate operation as it requires different tools.
Before you begin the thread operation reguardless of what method the stock HAS to be the correct size. That way when the threads are cut to spec the profile is correct.  

Well, a practical example is Collet drawtubes. I have to shave a tiny bit of the ID before threading. I use the single pint tool to do that <gasp. yeah, I said it! I don;t see any problem using the single point of a threading tool to shave small amounts to size the stock. Single point threading is the same operation. For those who get out of the shower to pee, this may seem like an abomination, but I just do it and not admit to it.   :-X

So, seriously, the pint is that with a 4th axis capable of turning and indexing (InTurn™ or higher end HMC) the tooling can be the same, -or- you can rig a number of tools. Realizing that your scope is to write a Wizard and not solve world hunger, I still can throw in as many fish as I can find and see what comes out of the pan, to use your analogy.

Here is a link to a private video (i.e. you will not be able to find it on YouTube without this link) https://www.youtube.com/watch?v=wuzQhZnlBbA

Notice the multiple tools on the tool bar. In this case the hole is drilled for a tap, but it could just as easily be bored and single pointed. With Mill/Turn and gang tooling, you need to think outside the box.


As to clearance moves a good wizard will let you EDIT the GCODE on the FLY to add such moves. This one does as well  {EDIT GCODE} OR I can add an edit Button that is conversational in nature BUT you still have to be able to tell it WHERE and HOW to dodge the problems. The wizard CANNOT read the part in the Chuck. (well it COULD but (;-))

Rememeber Wizards are conversational AIDS to programming NOT a robotic programmer of parts(;-).

Maybe you could just have a 'dodge' (I like that term) in X checkbox with a distance. That is really the only alternative when you run out of Z.  The code would just as the X move out before the A rotation and then back in. These would occur in the same place as the unlock/lock commands. So basically

Unlock
--<is 'dodge' checked?>--
<yes> add G0X(distance var)
<no> no line added
Rotate A
--<is 'dodge' checked?>--
<yes> Add G0X(negative distance var)
<no> no line added
LOCK


-or-

universally add G0X(distance)  where distance would default to 0 unless set by user

OK, enough chatter, here is a photo. You can download a higher res version here:www.thecubestudio.com/pictures/UltraRadialDrillingSetup.jpg

« Last Edit: January 31, 2015, 11:36:30 AM by simpson36 »

Offline BR549

*
  •  6,965 6,965
    • View Profile
Re: Success! Mini Machining Center under Mach3 control - Video link
« Reply #306 on: January 31, 2015, 12:07:24 PM »
You best be "dodging" that chuck jaw in that photo (;-)

I'll add the button easy enough.  It will ask you HOW FAR TO DODGE. And then write the dodge code OR do the move live depending on the record button's state.


WAIT::::  I already have a function to cover that. Look at teh MOVE TO POSITION section. You input where you want to move to and it will write the code for you to dodge things.

(;-)TP


Offline simpson36

*
  •  1,369 1,369
    • View Profile
Re: Success! Mini Machining Center under Mach3 control - Video link
« Reply #307 on: February 02, 2015, 01:29:23 AM »
Perfect!.

Let me know when I can have a copy of the wizard to play with. I am running a bunch of parts now that to not require the InTurn™ so it will be a while before I can do testing .

Offline Davek0974

*
  •  2,606 2,606
    • View Profile
Re: Success! Mini Machining Center under Mach3 control - Video link
« Reply #308 on: April 19, 2019, 04:33:24 AM »
These are the new drive parts. Older trapezoid tooth belt is gone, replaced by newer GT2 type. Quieter and can handle a lot more power. This time rather than making a pulley from scratch, I took an off-the-shelf pulley and modified it by cutting out the center and mounting it to a stock clamping collar which is comes already drilled for mounting a pulley. Between the stock pulley and clamp collar, I saved several hours over starting from scratch. Collar is bored for a slip fit on the spindle . . no  more threads. Preload will be accomplished differently. More on that later:

Spindle is out of a PhaseII brand 5C spin indexer. Still an import, but about three times as expensive as the normal junk and it is much better quality. Roughness in center portion of the spindle is from me reducing the dia slightly in that area with a coarse zirconia flap wheel to ease bearing press and reduce the interference fit on the rear bearing for preload purposes. Front bearing (next to shoulder will have full press fit. I will probably be making my own spindle, but for now this is easier.


Hi all, apologies for waking up an old thread but it's an excellent thread.

How did you manage the preload - I can't find the answer anywhere :)