Hello Guest it is April 25, 2024, 12:44:25 AM

Show Posts

This section allows you to view all posts made by this member. Note that you can only see posts made in areas you currently have access to.


Messages - GuyFawkes

Pages: « 1 2 3
21
General Mach Discussion / Re: Limit Switch Problems
« on: December 19, 2008, 12:31:24 PM »
I'm not trying to imply that there is anything wrong with Mach. With exception of this problem it has work flawless for me. I'm not the only one experiencing this problem. I have found others on this forum with random estops as well. I think we are all looking for some input and direction as to where to look and what could cause it.

OK, so it ain't mach3 we agree? and it ain't the actual limit switch wiring quality or proximity to anything else we agree? It aint Windows we agree?

So what is different?

What is your PC hardware spec?

What is your stepper control hardware spec?

22
General Mach Discussion / Re: Limit Switch Problems
« on: December 19, 2008, 11:39:09 AM »
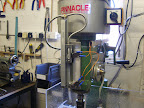
If you'll take a look at the picture below (thumbnail link) you can see the limit switch wiring on my Z axis.

The X and Y are basically wired the same way, to the same "standard" and using the same wire.

There is a crap load of other stuff, including compressors and variable speed motor inverters, all sharing the same spur mains feed from the main house... of course the "workshop PC" shares this same power source.

The workshop PC itself is an ex corporate dell. It doesn't just run mach3, but is also burdened with some CAD software, CAM software, and is used to browse the net or simply play mp3s when I'm not doing CNC stuff.

The CNC electronics hardware itself is however half decent quality kit, originally Chinese made to be sure, but half decent nonetheless.

I'm posting this because it is worth making the point that despite what should be a pretty atrocious and problem ridden installation, I get basically zero problems, even when starting and stopping or varying the speed on the lathe motor, even when the compressors kick in, blah blah blah.

Clearly I'm running the same copy of Mach3 as everyone else, I don't have gold plated artsoft bytes, and bill gates didn't send me a personally made version of XP.

And yet is is as stable as can be.

Clearly stability is not something that can only be achieved by the use of properly screened and grounded limit cables, etc etc etc.

So the variations between machines, why is mine stable and yours not? Logically must revolve around the stuff that is different.

The stuff that is different is going to be the actual workshop computer components / hardware / psu etc, and the stuff that is different is going to be the actual stepper circuits and even steppers themselves.

I used an old corporate PC and half decent stepper hardware, and the whole thing seems rock solid DESPITE my efforts to the contrary.

Whereas there doesn't appear to be any shortage of people having problems using high end laptops and heinz 57 flavours of stepper drivers and even USB interfaces between control computer and stepper electronics.

Clearly, logic dictates that installations like mine are proof that there is actually nothing whatsoever "wrong" with Mach3, or WindowsXP, or old corporate computers and parallel ports...

The alternative is that I am just ********* lucky and mach3 would run on an old casio watch provided it was within 5 metres of me, which isn't borne out by anything else around me.

HTH etc


From CNC Mill Conversion

23
General Mach Discussion / Re: Limit Switch Problems
« on: December 19, 2008, 07:57:13 AM »
There is also the "debounce" (from memory) setting in the basic config...

When I first wired my limit switches (wired being a fancy word for spaghetti) I had random "limit switch" events, I swapped out power leads for RFI suppression ones and all sorts, before actually RTFM and realising that it was a simple software config issue, which once altered has never returned to this day.

should make the point, this was with totally unshielded single conductor wire for limit switches, which runs past and around spindle induction motor and the axis steppers etc etc etc. No problems.

24
"slow" is relative.

"slow" at playing Crysis, mebbe.

Fact is you simply can't beat older, quality, hardware.

Your Dual P3/850 Supermicro will be faster and more importantly vastly more stable at many, many, many tasks than the latest top of the range core 2 quad laptop.

You don't have to know Mach3 that well (I don't, as a relative newbie to it) because Mach3 is code, and this applies to all code.

Still, this never has and never will stopped people from deliberately going out and buying something because they want it (eg core 2 quad laptop) and then whining because it runs some bit of code less than optimally, like it is somehow everyone else's fault but theirs.

Not only is stuff like your old quality hardware more suitable, it is also more affordable, than any new consumer grade kit, and when you ask me what computer is running Mach3 etc in my workshop I am as likely to answer "an ex corporate server I got for 50 quid, including the TFT" as I am to give you a precise Dell make and model number, because the fact is you can't claim to not be able to afford an older computer for the workshop, if you can't afford that then you can't afford Mach3, a bunch of machine tools, and light and heat.

cheers

25
Share Your GCode / Re: CNC robot arm project
« on: December 19, 2008, 06:09:37 AM »
1/ it will only ever be as good as the pivots.

2/ triangulation of the "muscles" to as near as possible equilateral triangles when in the centre of the movement envelope.

When you get it built avoid rapid / sudden start / stops, that makes it sway and you have to wait for that to damp before you get your positional accuracy, and of course the more weight you carry the more the swaying...

acrylic adhesive / solvent, essential, 3 x 10 mm thick base pieces all flex, welded into one 30 mm thick piece it is surprisingly rigid even before you add the flanges.

The linear stepper motors are available (in the uk) from http://www.motioncontrolproducts.co.uk/ as "captive linear stepper" priced at £7.89 each (I do not work for or have any interest in MCP etc) if you want to go that route to making the "grab"

the stiffening between the sides is essential, once you get the muscles sorted and positioned, you turn two parallel flat bars into box section that way.

really, really, really don't be going for fast motion with these, the slower you can run them the more accurate they are.

AT the low end acrylic is wonderful stuff, you can drill and tap it, which means a bog standard coupler like the old meccano shaft coupling (small brass tube with two grub screws to clamp shaft ends inserted into tube) can be used to attach a bog standard leadscrew / threaded bar to the stepper, and the other end you can just drill and tap a block of acrylic to suit the threaded bar.

Sure it is going to be a bit flaky and wear out this way, but it allows you to experiment on the cheap, quickly, and that is what this project is all about, above all else, it is a robot arm experiment / development kit project.

If you pull 3 connected bits out of the design and use them for something completely different then it has served its purpose.

As usual it is a deliberate study is doing as much engineering as possible with minimal levels of materials complexity and cost.

Worst case scenario is you got through 25 quids worth of acrylic, modified it slightly, and ended up with a toy crane for a boy.

26
Share Your GCode / CNC robot arm project
« on: December 18, 2008, 05:16:37 PM »
This one is different. I ran it by Tweakie first to see if it had a place here, he thought it did, so...

There are two sorts of projects, those that you follow to the letter and everyone gets the same result, and those that you customise and everyone gets a different result.

This is the latter type, it is a 95% complete robot arm, with plenty of hints about the remaining 5%.

Design reach height of 500 mm and reach lateral of 400 mm approx, archive as usual contains an html file and a bunch of dxf files, but that is all.

NB You absolutely REQUIRE a basic CAD app that can import .dxf files so that you can do the last 5% of the design work yourself, and then export to CAM and then CNC.

n joy

27
Share Your GCode / Re: CNC Vacuum table project
« on: December 16, 2008, 07:22:08 AM »
Glad you're enjoying it.

BTW for you and others, re this and the CPU waterblock and basically everything that I do with acrylic...

The secret with acrylic is the joining, not an adhesive, but a solvent that melts and then welds the two pieces into one. I use Tensol 12 (brand name) but the active ingredient is DMM, or Dichloromethane Methyl Methacrylate.

Excellent how to guide at http://uk.youtube.com/watch?v=hT6Ow_cBTps

28
Share Your GCode / CNC Vacuum table project
« on: December 12, 2008, 11:01:05 PM »
Another quickie.

How to make a useful and passable vacuum table from 20 quids worth of acrylic, for a machine with a work envelope of 300 x 150 mm (just scale as reqd) with a holding force of up to 75 Kg

Only tool required (apart from a source of vacuum) is a SHARP 4mm end mill and some acrylic, and time to give your cnc machine a workout.

zip archive contains stl and dxf files, how to, etc etc, again not meant to be a masterclass.

njoy

29
Share Your GCode / CNC CPU waterblock project
« on: December 10, 2008, 11:11:51 AM »
It's a 493 kb zip, how to make a CPU waterblock from aluminium and acrylic complete with object drawings in dxf and stl format.

It is NOT meant to be the best ever CPU waterblock. The idea is an introduction to making something a bit more complex than a sign or lithopane on your CNC mill, specifically more than one object that has to fit together as components to make a product.

It is also not meant to be a masterclass or hold your hand every step of the way with step by step instructions, the idea is to make you think, and give you a practical and cheap project to practice on.

Archive contains archives of the dxf / stl models, index.html file, and some sample .nc files, just download and extract to hard disk and open the index.html in the browser of your choice.

Have phun.

30
Hello, just introducing myself to the forum.

Am now at the stage where conversion of my old universal mill to CNC control is just about done.

I've sort of haphazardly documented the process, including the mistakes, partially for a record for myself but also because in my research prior to doing this I didn't find any links to anything that actually dealt with any of the questions I personally wanted answers to, so this is probably only the 10,000th time this has been duplicated on the web so far....

The donor machine had an XYZ envelope of approx 300 x 150 x 75 mm, (though that envelope could be considerably expanded, just unclamp and raise Z 350 mm or tilt head etc)  that is just the envelope of precision movement) belt drive 1 hp motor with spindle speeds up to 2500 rpm, a bridgie was too big for my space, but despite being an older style machine it was actually still quite accurate with only a little wear in the (trapezoidal) leadscrews, which I have not swapped out for ballscrews.

I made a deliberate choice to build a CNC machine rather than simply buy one, because you don't get to understand something unless you have built it, but most importantly for anyone considering this option, you cannot know, going into the build, what you are going to learn, so your estimates of what you will learn are a lot lower than what you actually do learn, so if this "learning bonus" is a factor in your decision the chances are you will come out of it at the other end wishing you'd made the project a higher priority.... it took me near three years to get in gear, and six months from actually buying the first parts, stupid, because I'd have saved all that time (and more) on the other projects that got in the way in the meantime.

Have pictures of the various stages at

http://picasaweb.google.com/fasand.words/CNCMillConversion#

And (so far) 4 videos

http://video.google.com/videoplay?docid=-7470965926215097427&hl=en
http://video.google.com/videoplay?docid=-8046410346841899515&hl=en
http://video.google.com/videoplay?docid=9162676120633297756&hl=en
http://video.google.com/videoplay?docid=-1905201439466713100

And (home server on cable so be patient) blogged the process here

https://surfbaud.dyndns.org/sites/blog/index.php?/categories/23-Mill-Lathe/P5.html
https://surfbaud.dyndns.org/sites/blog/index.php?/categories/23-Mill-Lathe/P4.html
https://surfbaud.dyndns.org/sites/blog/index.php?/categories/23-Mill-Lathe/P3.html
https://surfbaud.dyndns.org/sites/blog/index.php?/categories/23-Mill-Lathe/P2.html
https://surfbaud.dyndns.org/sites/blog/index.php?/categories/23-Mill-Lathe/P1.html

have phun

Pages: « 1 2 3