Hello Guest it is April 25, 2024, 07:32:23 AM

Show Posts

This section allows you to view all posts made by this member. Note that you can only see posts made in areas you currently have access to.


Messages - mmoe

Pages: 1 2 3 »
1
CS-Lab / Re: Cs-lab ordering
« on: January 03, 2015, 02:24:50 PM »
Between my own shipment, and the shipments that some those I've recommended CS Labs to locally here in Seattle have ordered, the time frame to get the controller has been as if they were shipped in the US by regular mail (as a comparison). As I recall, it took about 4 or 5 days, which was stunning considering the distance. The others I know also got their orders in less than a week every time. I can't say it will be exactly the same for you, but I don't think you'll be disappointed in the shipping time.

I recall the box coming via UPS, but it's been a while. There was no duty/taxes required, but that did surprise me since it was a pretty substantial order (IP-A plus 4 I/O Modules). I would plan that it may happen, since UPS often seems to collect for this kind of shipment. I was never told by others if they had to pay duty, and since a couple of them aren't used to ordering parts like this in, I'm pretty sure they would have complained about it if there was an additional fee on arrival. None of them had an order bigger than just a IP-S or IP-A, and a couple were IP-M's, so smaller orders on the whole.

The one thing I'll say is that the shipping is a bit expensive. Not a complaint really, but you just should plan ahead on your order. If you are on the fence about getting an I/O module, or the MPG module, I'd recommend adding it to the order. As I recall, the shipping was about the same, if not exactly the same, for just the IP-A as it was for the IP-A and the 4 I/O modules, and if you want one I/O module or the MPG module later, it will add about $80 (last I checked). Better to just order it up front and save on the shipping cost of a second shipment given how much it costs to ship. I still regret not adding the MPG to my order since it would add quite a bit to the cost of the MPG to order one now. I'll get one eventually, but not until I have a more substantial order to place.

Otherwise, they ship very well. The packaging is really good and it arrives very fast given the distance. No complaints at all.

2
CS-Lab / Re: outputs 4 and 5 on CSMIO
« on: July 31, 2014, 03:12:03 PM »
CSMIO/IP-M and VFD
http://www.cs-lab.eu/en/index.php?m=article&show&aid=132&uinfo=CSMIOIPM__VFD

BR
CS-Lab Team

In the link above, I believe you need to look at your wiring diagram and make a correction. Everything in the write-up is excellent, but I believe the diagram for wiring the relay is incorrect. From the write up:

Quote
If we at this moment enter the "M3" into the MDI line and we press ENTER the no. 1 relay will close the electrical circuit between the screw terminals no. 12 and 25. On the other hand in the „PlugIn Control\CSMIO_IP plugin\Digital IO” tab and „Diganostics (Alt-7)” tab we will notice active diodes of  „Output 1” (Mach3 virtual output) and „Digital outputs no.4” (digital output that controls the relay no. 1).

However, if you send a signal on no 12 to the relay as you show it, it will do nothing and remain open because a relay is operated by the coil, not the contacts at the switch side of the relay. The coil in your diagram is connected to nothing, so the relay will do nothing. Please review and compare to the diagram I supplied above showing how to connect the coils of the relays to the controller, rather than the switch outputs of the relays, which should be used to turn the intended hardware on or off using either the normally open and/or normally closed terminals of the relay. If the coil does not become active, the state of the relay (NC/NO) does not change.

3
CS-Lab / Re: outputs 4 and 5 on CSMIO
« on: July 28, 2014, 07:03:47 PM »
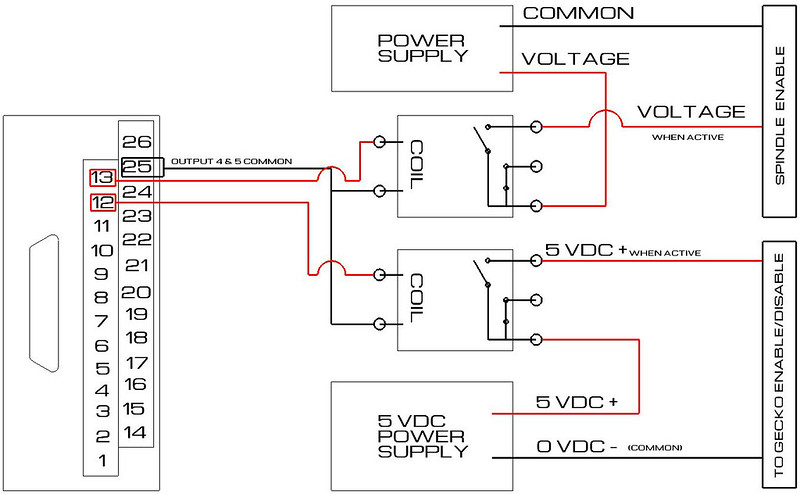
Been in the shop for the afternoon, but managed to put together a diagram of how I think the wiring should look. A few qualifiers first; it's been a while since I've installed an IP-M or really even looked at one closely. That said, I have worked with all three CSMIO controllers, so they are relatively familiar to me (IP-A, IP-S and IP-M, as well as the I/O modules). I don't know much about your specific Gecko drives but have dealt with a couple of their products as well, so you'll have to adjust based on your model. I also don't know much about the spindle controller you are using, so you'll need to figure out what voltage the spindle enable signal needs to be. The only thing I have not shown is the Analog connections, but those are really quite straight forward once you have this part done.

On the Gecko drives, they have two different configurations (I believe). One is that you short the disable pin to one of the resistor pins (the last pin on the drive IIRC). The other is that you simply supply 5 volts to the disable pin, but in that case I believe that the common for the 5 volt signal is shared with the step/dir common back to the controller. The former is much easier to deal with than the latter. If you have the latter kind, I'd be very careful about how you supply 5 volts since you will need to share the common pin between what are essentially two different power supplies. I think this can be done, but I would not call it ideal. I think it was meant more for connecting to controllers that work on a 5v power supply, not a 24 volt power supply, which would make it easier to use an output to disable/enable the drive directly. I'm not sure if Outputs 4 and 5 share the same basic common internally as the Step/Dir  system, so it's hard to say if you can simply use a resistor to drop the voltage and connect an output directly to the Geckos, but if this is possible, it may be the better method than using a relay. I would contact CS Labs regarding this specific situation if that's what you face. If you have the other version where you just short the disable pin to the resistor pin, you don't even need a power supply. In that case, you just eliminate the 5 volt power supply from my diagram and when the switch closes, the pins short at the drive. In other words, the resistor terminal on the gecko can be though of as the common, and it would connect to the relay where the power supply 5 volt is depicted connecting currently. The 5 volt line from the relay to the drive would not have 5 volts, and would simply connect the relay to the disable pin. Hope that makes sense as it's difficult to cover all scenarios in a single diagram and you'll have to visualize the differences.

For the sake of making the diagram clear (due to how it laid out), I made Output 4 operate the stepper enable relay and Output 5 operate the spindle relay. You could simply switch the connections at the CSMIO terminal block to change this, or configure the outputs differently in Mach 3 "ports and pins" settings. I additionally am not implying anything specific about the drives or the spindle controller, so you'll have to fill in the blanks. You could do the same as below using the outputs 0, 1, 2, or 3 as well, but for those outputs you would have to jump 24 volts from the controller power supply to pin 9 on the terminal block and the same power supply 0 volts (common) to pin 22. Once you have power to those outputs, I don't see any reason why they could not also be used for relays in this same manner.

CSMIO IP-M Relay Diagram by mmoe5150, on Flickr

4
CS-Lab / Re: outputs 4 and 5 on CSMIO
« on: July 28, 2014, 03:20:03 PM »
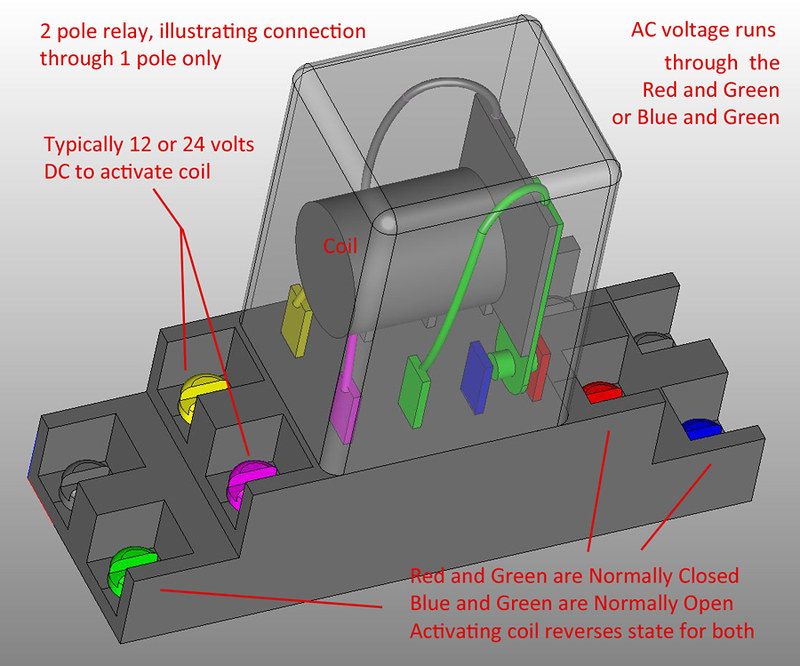
Here's a quick diagram I did a while back that shows the function and connections of a typical relay. This is a mechanical relay, but a solid state relay would operate on the same principals, just accomplishing the task a little different internally. Again, your goal is to operate the coil of the relay with the CSMIO outputs, then let the relay provide the connections from there.

Relay by mmoe5150, on Flickr

5
CS-Lab / Re: outputs 4 and 5 on CSMIO
« on: July 28, 2014, 01:14:36 PM »
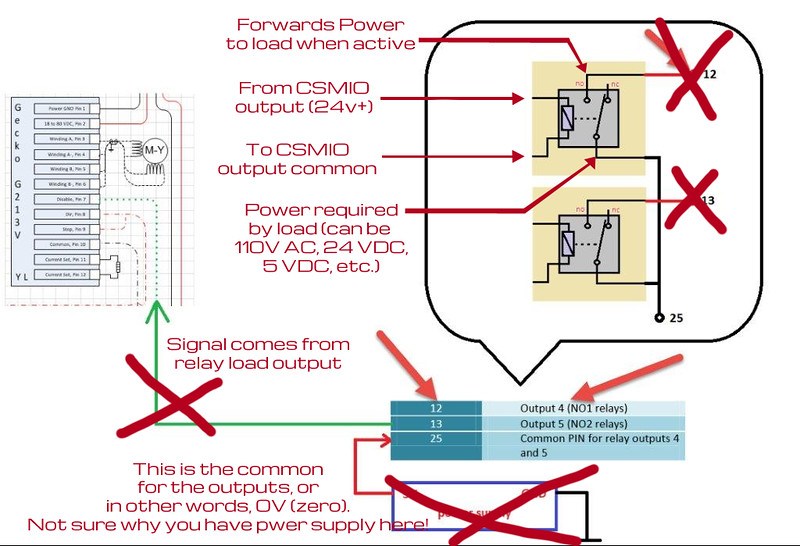
If you hooked up the relays as you depicted in the first page, the problem likely stems from the wiring more so than the configuration. You need to fix the wiring first or you'll be spinning your wheels. For that matter, it's entirely possible that you have damaged the controller if you've hooked it up the way you have shown. Putting a 5 volt power supply positive to the common of the outputs is essentially sending 5 volts backwards through the outputs system, where the CSMIO outputs are meant to operate at 24 volts and that pin is essentially the "ground" (though ground is not a good term for a common as they are technically different). Here's a correction to the diagram:

RelayCorrections by mmoe5150, on Flickr


The problem is several things. First, CSMIO outputs should be used to turn relays on and off using a 24volt DC power supply (same one providing 24 volts to the controller itself is fine). At the CSMIO controller, you need to supply 24VDC to a specific pin that will provide power for the outputs. The outputs then forwards the 24VDC signal to the relay when it is turned on. The relay is activated by running 24 volts DC through the coil (you must have a 24 VDC coil relay, so not all relays are the same!). The coil is also connected to the CSMIO at the outputs "common" to complete the coil circuit. The switch portion of the relay is used to forward voltage to a load, or in the case of an "enable/disable" loop, you are forwarding a voltage as a signal. Regardless of what the load or signal is, the coil is all that is run by CSMIO. If you need 5 volts to enable/disable your Gecko drive, you must have a separate power supply that runs 5 volts to the relay switch, which will then be forwarded to the drive from the relay when the CSMIO activates the relay's coil. This 5 volts does not ever get run through the CSMIO, it is run through the relay. Similarly, you can send 110 VAC, 220 VAC, 24 VDC, 10 VDC, 5VDC or whatever else you might need through the relay switch, which is turned on and off by the CSMIO output. The only limitation then is that the relay is going to be rated for somewhere around 5amp to 12 amps, depending on the relay.

Re-read the manual regarding how to properly configure an output from the controller. Hope that helps, and feel free to ask if you don't understand.

6
General Mach Discussion / Re: DB9 Connectors for Limits / Motors
« on: November 30, 2013, 03:02:27 PM »
I agree that you'll want to keep the wiring separate for each motor and each encoder. Those terminals you have are really to eliminate the need for plugging stuff in, and most commercial CNC machines just bring the cable right to the terminals. You then wire from the terminals to the various other internal destinations. I can say that I don't have a single connector for encoders or motors on my machine and it originally cost around $150k, so it wasn't to save money. ;)

The cables just go through a strain relief into the controller cabinet (often in a bundle of cables), run through the cable ducts, then you pull the individual wires out through the sides of the ducts and connect them to terminals. That's how they are typically done for commercial applications.

7
CS-Lab / Re: Shorting output pin for disabling gecko G251X
« on: August 09, 2013, 01:42:04 PM »
I'm not quite sure what you are asking for. It sounds like you want the controller to have an active output when Mach 3 is not running? If so, then no that is not possible. The controller will basically go to a state of "reset" when it looses connection to Mach 3, regardless of whether or not the cause of the disruption is intentional or not. If an output could stay active when the connection between Mach 3 and the controller is lost, that could result in a very dangerous condition, so by design the controller will stop everything if the connection is lost. I've tested this and found that it takes about 1-2 seconds during operation for the controller to shut down the outputs and any motion it may be running when the connection is lost, so it isn't quite immediate, but it is fast enough that it would prevent dangerous conditions.

Normally, you would use an active output signal to turn the servos on, so it sounds like you are doing it backwards by using an active output signal to turn them off. A standard relay like those I suggested have the ability to either open a circuit when the coil is active (on signal from controller), or close a circuit when the coil is active depending on how you wire the relay. If the relay is a 2-pole relay, there should be a total of eight connection terminals. Two of them are the coil circuit, which is hooked up to the output signal from the controller. The other six form two separate switches through the relay, so basically three terminals per switch. Those three terminals produce one normally open switch and one normally closed switch. If your drives turn on by shorting the enable/disable pin, then you would set it up so that the circuit is connected to the "normally open" side of the relay. If your drive is turned off by shorting the enable/disable pin (it sounds like this is the case), then you would set it up so the circuit runs through the normally closed side of the relay. In the case of the latter, when you start Mach 3 it will be in reset and the drives will remain off until you press reset. Once you press reset, the output you have designated for this purpose will become active and the relay will open the circuit, allowing the drives to turn on. When Mach 3 goes into reset, the output will deactivate and the circuit will close again, causing the drives to turn off and stop any motion that may currently be happening. If Mach 3 is shut down, the output will also remain inactive, and the circuit will also remain closed leaving the drives off.  

8
CS-Lab / Re: Shorting output pin for disabling gecko G251X
« on: August 07, 2013, 02:11:10 AM »
It's best to use relay in my opinion. The main issue is that I'm guessing the power supplied to the disable pin is provided internally by the Gecko drive itself, so I'm not seeing how you could complete the circuit through the outputs, which are powered by their own power supply. You put 24V and ground to specific pins to power a small group of outputs (each group requiring their own power supply/ground). They don't function without the power supply and will only complete a circuit with that power supply. For the $15 that a relay costs, I think it would be risky and foolish not to just buy one and do it right. I don't think you could expect CS Labs to warranty the controller if you connect it that way unless you specifically ask them if it can be done.

My experience with the outputs from the CSMIO IP-A is that relay with diode will not function properly. I had tried several out with no success and then replaced them with more simplified relay that just had a straight LED indicator, and it worked just fine. The part number for the relays I found work well is Idec #RU2S-D24 (2 pole relay) and Idec #RU4S-D24 (4 pole relay). I also had no trouble with a basic non-LED relay with 24v DC coil, so it seems like the Diode based ones are the ones to stay away from. They cause a current draw that exceeds the 250ma limit (double check the number for yours, I'm going off of memory), which gives a fault in the CS Labs plugin for whatever output you have connected to it.

9
CS-Lab / Re: First impressions of CS-Lab products
« on: July 11, 2013, 06:23:50 PM »
I just double checked Sig's controller and it is not possible to reflash the firmware. In this case, the controller won't connect to the computer, so there is no way to send the firmware to it.

When you turn it on, it sometimes flashes the "STAT"  LED in a very quick pulse, sometimes the "STAT" LED stays on but the network LED stays off, and then sometimes the "STAT" LED doesn't come on at all and the network LED slowly turns on from a dim to a bright and them goes back to dim. I think that in this case there is something wrong with the controller hardware itself, so there really doesn't appear to be a way to fix it aside from sending it back for repair.

10
CS-Lab / Re: First impressions of CS-Lab products
« on: July 11, 2013, 01:24:13 PM »
Boutje,
Do you mean that you reflashed the firmware to the controller?

Pages: 1 2 3 »