Welcome, Guest. Please login or register.
Did you miss your activation email?
May 23, 2012, 10:00:34 PM

Login with username, password and session length
Search:     Advanced search
* Home Help Search Calendar Links Login Register
+  Machsupport Forum
|-+  General CNC Chat
| |-+  Show"N"Tell ( Your Machines)
| | |-+  Laser cross hair tool position.
Pages: 1 2 3 4 »   Go Down
Print
Author Topic: Laser cross hair tool position.  (Read 5794 times)
0 Members and 2 Guests are viewing this topic.
Tweakie.CNC
Active Member

Offline Offline

Posts: 3,253


Super Kitty.


View Profile WWW
« on: March 12, 2009, 11:53:53 AM »

A simple project for a rainy day.

I recently bought one of these laser cross hair pointers on ebay. Unfortunately they are not that well made (what can you expect from China and cheap as chips) the focus ring incorporating a prism assembly is a very sloppy fit in its mounting thread and any movement here alters the cross hair position. After some deliberation I made a clamp which bolts to the Z Axis and grips both the body and the focus ring of the pointer - this makes the whole thing rigid and it cannot be accidentally moved once set. Setting it up is a bit more tricky as the focus has to be adjusted for optimum at mid Z Axis travel, then rotated until the cross is exactly X - Y alligned (although this is not so critical if you are only interested in the center position of the cross) and finally the cross must not move position when the Z Axis is traversed up and down. Two or three goes at milling dust off the mounting and it was perfect. Because the reflectivity of different materials and surfaces varies I have incorporated a polarised disc beneath the pointer and this can be rotated 90 degrees. (The light from these laser pointers is plane polarized and by using a rotatable polarized filter the apparent brightness of the beam can be varied between full on and off - allowing for the optimum brightness to be set)

Thanks to posts by Hood and Greg I added a button to the Mach screen and pasted the modified button script (after carefully measuring the offset between the cross hair and tool position, using the Mach DRO's). Brilliant, it works so well I really don't know why I did not do this sooner. At the moment I am using a battery to power the pointer but a 3 Volt supply and on/off switch will be added tomorrow.

Tweakie.


* DSC00677a.jpg (21.6 KB, 800x536 - viewed 350 times.)

* DSC00678a.jpg (48.89 KB, 800x536 - viewed 386 times.)

* DSC00679a.jpg (44.43 KB, 800x536 - viewed 372 times.)
Logged

Success consists of going from failure to failure without loss of enthusiasm.  Winston Churchill.
budman68
Master of the Custodial Arts, or better known as:
Global Moderator
*
Offline Offline

Posts: 1,994


View Profile
« Reply #1 on: March 12, 2009, 12:31:47 PM »

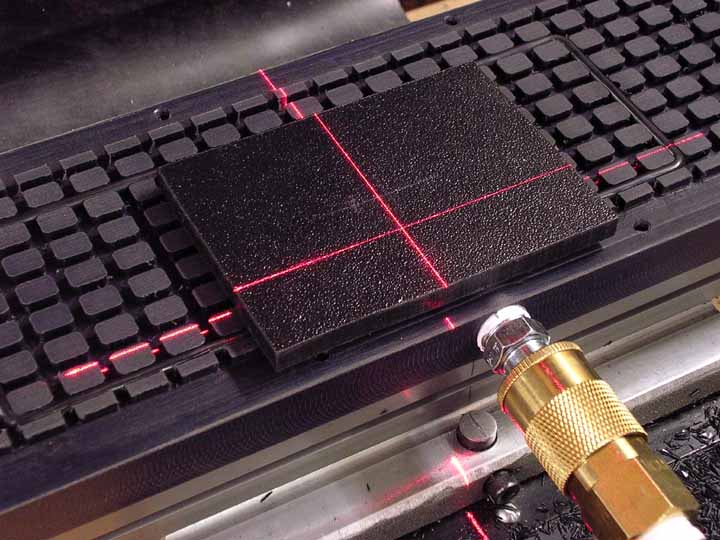
I have used this for quite a while now and yes, it's a VERY handy tool to have for quick locations on sheet material and or picking up edges.

The smallest I could get mine was .010" of an inch which is not too shabby but I'd like to know more about your polarizing filter and what you used. I have a glass one from an old camera but haven't cut it yet, may I ask what you used?

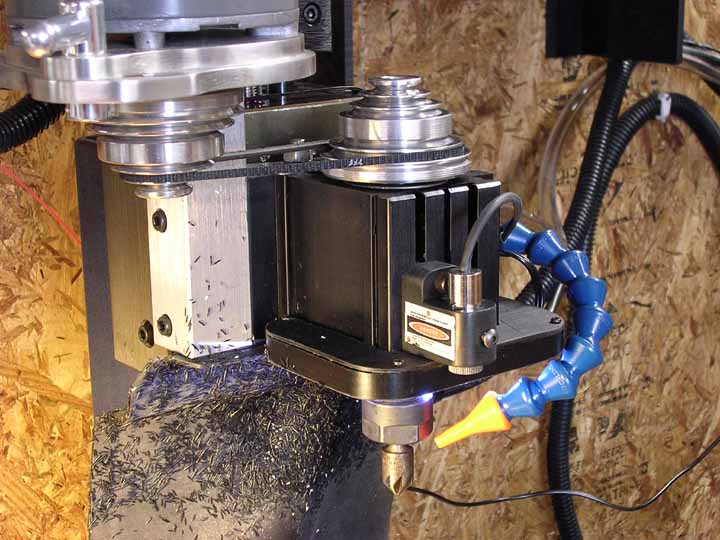
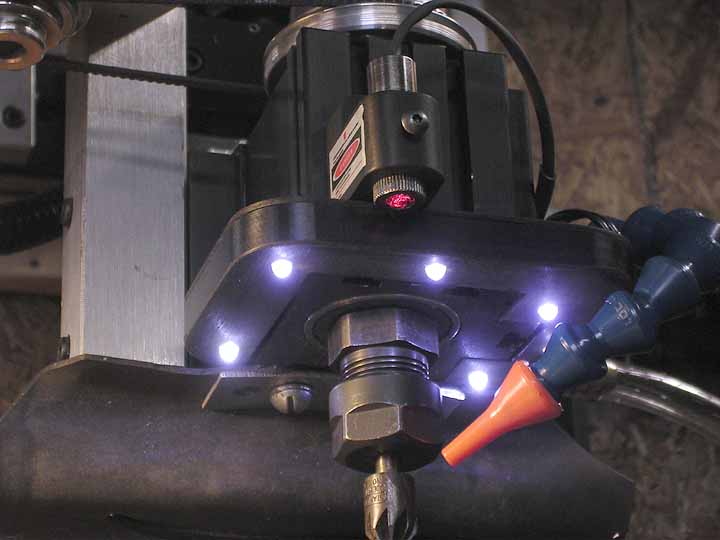
The sort of Delrin clamp I used has a through hole for the body and a counterbore for the knurled part and is pushed up into the counterbore and then locked down with the screw so it can't vibrate loose. I actually moved it since these pics were taken, over to the right side of the headstock to get it "out of the way".

I have it powered with a wall wart AC adapter and has been working for a little over a year now.

Thanks for sharing-
Dave


Logged

----------------------------------------------------------------------
Just because I'm a Global Moderator, don't assume that I know anything !

Dave->    Wink
Tweakie.CNC
Active Member

Offline Offline

Posts: 3,253


Super Kitty.


View Profile WWW
« Reply #2 on: March 12, 2009, 02:13:04 PM »

Hi Dave,

I saw your excellent post when I was researching my project - it just took a while to locate the laser pointer.

I bought the polarizing film as a small sheet. It is laminated plastic and easily cut into the shape required with scissors.

Here is an ebay uk link which will work for a couple of days at least.

http://shop.ebay.co.uk/items/_W0QQ_sopZ10?_nkw=polarising+sheet&_sacat=0&_fromfsb=&_trksid=m270.l1313&_odkw=cnc&_osacat=12576

Tweakie.
Logged

Success consists of going from failure to failure without loss of enthusiasm.  Winston Churchill.
budman68
Master of the Custodial Arts, or better known as:
Global Moderator
*
Offline Offline

Posts: 1,994


View Profile
« Reply #3 on: March 12, 2009, 02:24:13 PM »

Interesting, I will have to look locally for  that material.

I appreciate the heads up, my friend-  Smiley

Dave
Logged

----------------------------------------------------------------------
Just because I'm a Global Moderator, don't assume that I know anything !

Dave->    Wink
Greolt
Global Moderator
*
Offline Offline

Posts: 872


View Profile
« Reply #4 on: March 13, 2009, 01:16:55 AM »

Tweakie

Just to give you something to think about,  Grin

I have my cross hair laser directly powered from an out-put. No battery or wall plug.

BoB specs say 20 miliamp is available on each out-put pin.  Laser only uses about ten miliamps.

A resistor in series with it just to drop the 5v down to about 3v.

The advantage is that an on-screen button turns the laser on and off.

Also the macro that positions the spindle over the spot also tuns the laser off.

Greg
Logged
Tweakie.CNC
Active Member

Offline Offline

Posts: 3,253


Super Kitty.


View Profile WWW
« Reply #5 on: March 13, 2009, 02:00:24 AM »

Thanks Greg,

I will try that today and see how it goes.

Tweakie.
Logged

Success consists of going from failure to failure without loss of enthusiasm.  Winston Churchill.
Tweakie.CNC
Active Member

Offline Offline

Posts: 3,253


Super Kitty.


View Profile WWW
« Reply #6 on: March 13, 2009, 09:03:32 AM »

I am being incredibly lazy here but I wonder if anyone would be good enough to help with the VB Script to turn the laser on and off as Greg has suggested.

Thanks,

Tweakie.
Logged

Success consists of going from failure to failure without loss of enthusiasm.  Winston Churchill.
poppabear
S S SYSTEMS, LLC
Global Moderator
*
Offline Offline

Posts: 1,707


Briceville, TN, USA


View Profile WWW
« Reply #7 on: March 13, 2009, 09:18:12 AM »

Pick an OUTPUT, lets say OUTPUT5, enable it under ports and pins and map it to your PP output Port and pin.

Then in a button put the Following:

If IsOutputActive(OUTPUT5) Then
DeActivateSignal(OUTPUT5)
else
ActivateSignal(OUTPUT5)
end if

scott
Logged

Commercial Mach3: Screens (regular and flash), Wizards, Plug-ins, Brains, PLCs, Macros, ATC's, machine build, retrofit and Prototyping
http://sites.google.com/site/volunteerfablab/
Tweakie.CNC
Active Member

Offline Offline

Posts: 3,253


Super Kitty.


View Profile WWW
« Reply #8 on: March 13, 2009, 10:15:17 AM »

Thanks Scott, you are a gentleman.

(I have now found the customization wiki which explains everything but will take some time to digest).
Thanks again and sorry that I am such a slouch.

Tweakie.
Logged

Success consists of going from failure to failure without loss of enthusiasm.  Winston Churchill.
budman68
Master of the Custodial Arts, or better known as:
Global Moderator
*
Offline Offline

Posts: 1,994


View Profile
« Reply #9 on: March 13, 2009, 11:03:34 AM »

You have helped me as well Scott (once again!) as I'm working on a console and I have a button already lined up for this purpose.

And Tweakie, you saved a fellow slouch from asking yet another slouch-ish question  Grin

Thanks,
Dave
Logged

----------------------------------------------------------------------
Just because I'm a Global Moderator, don't assume that I know anything !

Dave->    Wink
Pages: 1 2 3 4 »   Go Up
Print
Jump to:  

Powered by MySQL Powered by PHP Powered by SMF 1.1.16 | SMF © 2011, Simple Machines Valid XHTML 1.0! Valid CSS!